Table of Contents
- Introduction
- Materials Needed
- Step-by-Step Crafting Guide
- Step 1: Sculpting the Core Finger Base
- Step 2: Carving Knuckles, Skin Folds, and the Claw Nail
- Step 3: Painting with Layers for Realistic Shading
- Step 4: Sealing with High-Gloss Varnish
- Final Showcase & Tips
- Call-to-Action
- Conclusion
- FAQs
Introduction
Jujutsu Kaisen has cemented its place as a modern anime phenomenon, with characters like Yuji Itadori, Megumi Fushiguro, and Ryomen Sukuna dominating convention halls worldwide. At the center of the series’ entire lore lies one notorious catalyst: the preserved, decay-ridden Cursed Finger of Sukuna.
Whether you are assembling a full cosplaying outfit or building an eye-catching display piece for your collection, having a screen-accurate finger prop elevates the entire presentation. In this DIY Sukuna finger prop tutorial, we break down how you can craft this iconic Cursed Object from scratch using budget-friendly materials without sacrificing detail or durability.
Materials Needed
You do not need expensive silicone molds or specialized equipment to achieve a screen-accurate look. These accessible materials yield high-impact results:
| Material / Tool | Purpose | Recommended Type |
| Sculpting Medium | Forms the body of the Cursed Finger | Polymer clay (e.g., Super Sculpey) or high-density EVA foam scraps |
| Sculpting Tools | Carving skin textures, wrinkles, and nail bed | Silicone tip brushes, wooden modeling tools, or a needle tool |
| Acrylic Paints | Base coating and detailed organic weathering | Dark brown, deep purple, crimson red, bone white, and black |
| Finish / Sealant | Creates a wet, eerie glaze and protects the paint | High-gloss varnish or UV resin |
| Abrasives | Smoothing rough seams before painting | Fine-grit sandpaper (400 to 600 grit) |
Step-by-Step Crafting Guide
Step 1: Sculpting the Core Finger Base
Start by conditioning your polymer clay until soft, or gluing together thin scraps of EVA foam to form a solid block. Roll the material into an elongated cylinder roughly 3.5 to 4 inches long, ensuring one end is slightly thicker to simulate the severed knuckle base.
Bend the mid-section slightly at an angle to give it an organic, hand-like curvature rather than a straight tube.
Step 2: Carving Knuckles, Skin Folds, and the Claw Nail
- Knuckle Definition: Press deep horizontal grooves into the primary joints to replicate natural skin folds. Use a needle tool or toothpick to add micro-creases surrounding the knuckle areas.
- The Severed End: At the base of the finger, rough up the edge to look jagged and torn rather than cleanly cut.
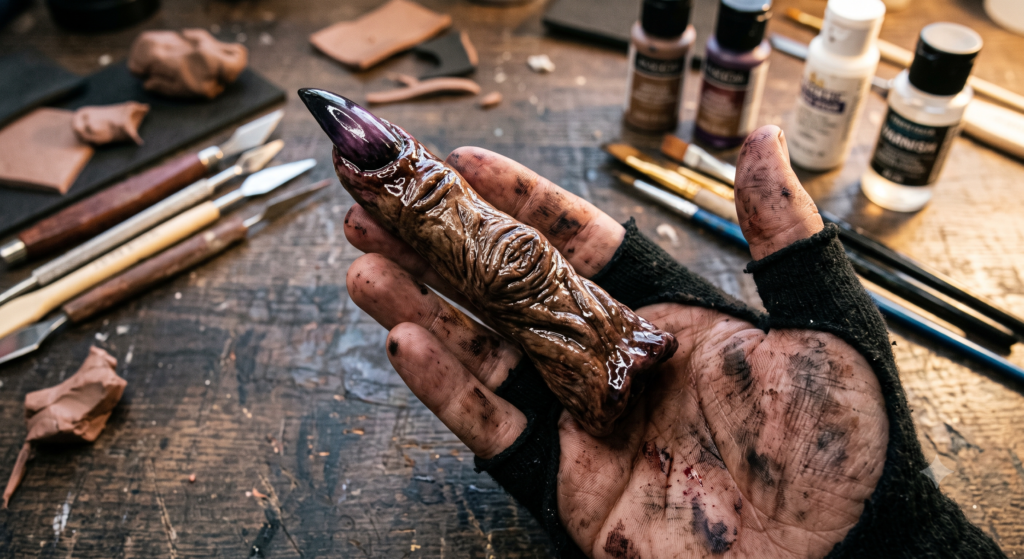
- The Claw Nail: Shape a elongated, sharp triangle onto the tip of the finger. Embed the edges slightly under a raised lip of clay to form a realistic nail bed.
If using polymer clay, bake according to the manufacturer’s package instructions at this point and let it cool completely before moving forward.
Step 3: Painting with Layers for Realistic Shading
A flat coat of paint will flatten the details. Depth comes from layering dark shades into light ones:
- Base Layer: Apply an even base of dark, muddy brown mixed with a touch of deep purple over the entire finger.
- Washing the Creases: Dilute black acrylic paint with a few drops of water to create a thin wash. Brush it over the finger so the dark pigment runs directly into the skin folds, knuckles, and severed base, then wipe off excess paint from raised surfaces with a paper towel.
- Highlighting: Lightly dry-brush a lighter tan/flesh tone over the high points of the skin to make the carved wrinkles pop.
- The Claw: Paint the nail black near the root, blending outward into a deep crimson and bone-white tip for a decayed, monstrous look.
Step 4: Sealing with High-Gloss Varnish
To achieve the fresh, wet look characteristic of Cursed Objects in Jujutsu Kaisen, apply two thin coats of high-gloss varnish over the entire prop. Allow the fingernail and severed end to receive an extra coat of gloss to enhance the organic contrast against the matte skin textures.
Final Showcase & Tips
Now that your prop is complete, keep these handling and display tips in mind for conventions and photography:
- Convention Transport: Store the finger in a padded pouch or acrylic display tube inside your bag. High-gloss finishes can scratch if bumped against metallic prop accessories.
- Posing for Photos: Hold the finger between your thumb and index finger when posing as Yuji or Megumi to recreate key anime frames.
- Prop Mounting: For home display, mount the finger inside a clear glass vial or on a faux wooden pedestal wrapped in traditional parchment paper or talismans.
Call-to-Action
Did you build your own Cursed Finger using this guide? Tag @Craftiverse on social media to show off your prop creations, or leave a comment below sharing your favorite anime prop project ideas for future tutorials!
Conclusion
Creating high-quality anime props does not require complex techniques or high budgets. By applying simple sculpting methods and strategic paint layering, you can transform basic crafting supplies into a screen-accurate Cursed Object. Follow this DIY Sukuna finger prop tutorial step by step, and you will have a durable, convention-ready accessory ready to elevate your next cosplay photo-shoot.
FAQs
What is the best material for beginners to make Sukuna’s finger?
Polymer clay is ideal for beginners because it holds fine detail well, allows unlimited working time before baking, and cures hard in a standard home oven.
Can I make this prop using EVA foam instead of clay?
Yes. High-density EVA foam scraps can be carved with a utility knife, textured with a dremel tool, sealed with heat/PVA glue, and painted using flexible acrylics.
How do I make the finger look wet or organic?
Applying multiple coats of a high-gloss acrylic varnish or UV resin onto the nail and severed base gives the finished prop an eerie, wet appearance.